Sunday, August 23, 2015

Sun Fire Salsa


I love homemade salsa.  HOT homemade salsa.  The first several times I made this salsa, it was a series of trial and error.  I just threw things into the pan until I finally got something I like.  I still may make some changes but for now, this is the recipe:

- 30 peeled tomatoes

Peel by putting in bowling water for a minute, then an ice bath for a minute.


Once peeled, squish by hand in a large pan - seeds, juice, and all.  I like to do this by hand because I feel like the tomatoes break down better.  If you want an even more broken down tomato base, get your hand mixer and mix for a few minutes on medium/low.

Put pan on stove on medium heat. 

- 3 grilling peppers 
- 10 hot banana peppers
- 25 jalapeno peppers
-3 Caribbean red habanero peppers
- 2 chili peppers
Use the chop option on your food processor to nice little chunks


Add the pepper mix to your tomatoes. 
Add 4 teaspoons of salt.

-10 sage leaves cut finely.

I start by washing, then cut out the stems.  Once I have strips I finely chop.  Add to the pan.


Cook on medium heat, stirring occasionally.  
I don't have a set time that I cook the salsa mix, just until I feel the flavors are spread nicely throughout the mix.


Spoon into jars (these should be sanitized.  Also boil the jars before spooning in the hot salsa mix to help avoid breaking)
Add canning lids, put in boiling water bath for 15 minutes.
Once out of boiling water, tighten lids.
This makes about 7 pints with just a bit left over to enjoy immediately.
Once open, keep refrigerated.


Sunday, August 16, 2015

Best Green Bean Side Dish

I make green beans all the time as a side dish.  A big part of that is because of the quantities I can during harvest time.  Thankfully everyone in my house loves green beans especially prepared like this.

- One pint of precooked green beans, water and all, to a pan

You can of course use fresh uncooked green beans.  If you decide to do so, cook for about 20 minutes.

- Add salt and pepper to taste

My husband and I prefer more pepper, but I go light on the pepper for my girls who are sensitive to the heat.

- Next add 1 tsp of power chicken bouillon 


- Simmer until hot or until the rest of your meal is complete.


Wednesday, August 12, 2015

Making Dream Catchers

This is a fun project I found on Pinterest from another blog.  We decided to give it a try.  Twice.


Start with paper plates, yarn, crayons, sissors, a hole punch, beads and feathers.


Cut the center out of the paper plates.


Color the ring.  Or paint if you prefer.


Use the hole punch to evenly space holes around the inner edge.


Cut a long piece of yarn.  
Tie to one of the holes.
Weave the yarn through the other holes.


Tie off the last end.
Punch a hole in the top and tie a piece of yarn as a hanger.


Punch three or four holes along the bottom.
Add beads and feathers to pieces of yarn.
Tie each to one of the bottom holes.


Hang up and enjoy.


Sunday, August 9, 2015

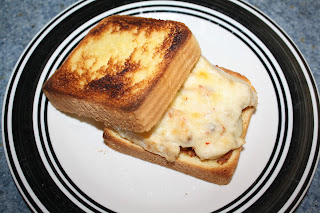
Fajita Sandwiches

This is a favorite of my husband's.  


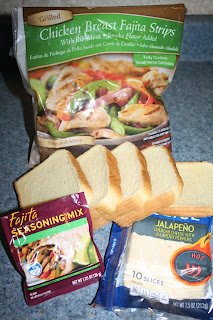
                                         You will need:
- Fajita Chicken (1 cup per sandwich)
-Fajita Seasoning
-Texas Toast (2 slices per sandwich)
-Jalapeno Cheese (Or your own favorite)
-Peppers and Onion slices, if you like


Butter the top piece of bread for your sandwiches
Mix the fajita seasoning with 1/2 the water called for on the package to create a spread
Spread the fajita season mix on the bottom piece of bread 


Add chicken on top of the fajita spread
(If you choose to use slices of peppers and onions add on top of cheese)
Add a slice of cheese on top of the chicken


Broil on medium heat until cheese is melted and top slice of bread is toasted.

These are so easy, very filling, and absolutely delicious!


Sunday, August 2, 2015

Frozen Blueberry Pancakes

My son loves pancakes for breakfast. Unfortunately I am not home most mornings to be able to prepare pancakes for him.  These easy, frozen pancakes are a great way for him to have a breakfast he enjoys even when I'm not there to make it.

I start out with fresh picked blue berries when I have them available.  There is a great berry farm near my home that has U-Pick blueberries.  My kids and I love to pick, and these pancakes are just one of the ways we use our bounty.


 -  Start out by washing the berries
- Lay out on paper towels to dry
- Follow the directions on your favorite pancake mix

I like to use a simple add water only pancake mix.  You can use a more complicated mix if you like.  Or if you feel really ambitious, make the pancakes from scratch.

- Once the pancake mix is ready, add as many blue berries as you like
- Mix well but be careful not to crush the berries


- Make your pancakes following the directions on your mix


-  Lay the pancakes out on a flat surface covered in wax paper until cool
- Cover a large cookie sheet with a layer of wax paper
-Once pancakes are completely cool, place on pan on wax paper

You can add another sheet of wax paper on top of the pancakes and add a second layer, but don't stack more than two layers high.

- Place cookie sheet in freezer and leave for 4 hours
- Remove from cookie sheet and place in freezer safe, labeled and dated, gallon bag

When you are ready to eat just remove from freezer bag, place on plate, and microwave for about 45 seconds.  I usually do 25-30 seconds then flip them over and microwave another 15-20 seconds.  This is for 3 pancakes.  Adjust your times for fewer or more pancakes.

- Cover in your favorite toppings and enjoy!